« Android Interview Questions
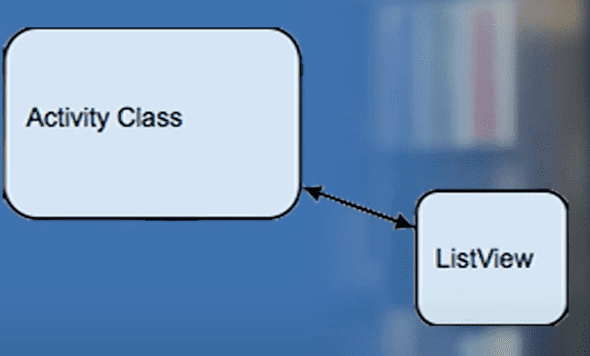
1.How are activity and its layout is connected?
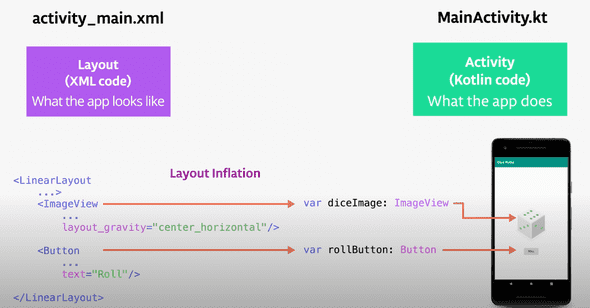
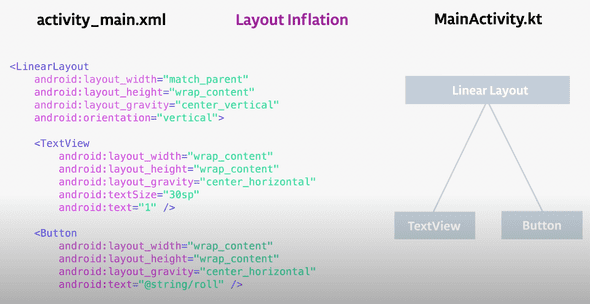
Answer: They are connected by a process called Layout Inflation. This process is triggered when the activity starts. During inflation the views defined in xml are inflated into Kotlin view objects into memory. Once this happens then activity can draw these objects onto the screen and also dynamically modify them.
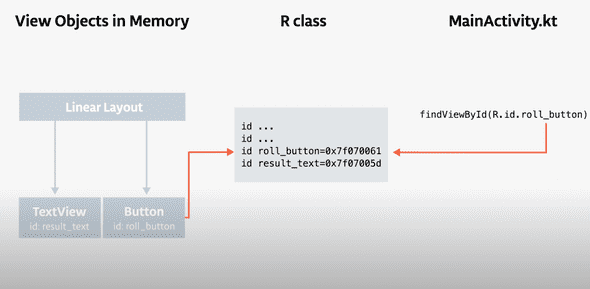
All inflated views are organised into a view hierarchy tree. Activity gets reference to the entire view hierarchy tree. If we want the specifc button we will need to search for it.
In xml we need to give unique id to the views. Every time we define an id to the xml views, Android studio will automatically create a integer constant with that ids name. It does this in a generated class called R. R stands for resources. It holds the mappings of all the resources matched to the view ids present in the project.
2.What is Context?
Answer: Context object allows you to communicate with and get the current state of the Android operating system.
3.What is the type of xml files in drawable folder?
Answer: Vector
4. Ideally we should be minimizing the number of calls to findViewById. We want to do this because each time we want to findViewById we need to search the hierarchy tree which is expensive operation. So we can store the view reference into a field so that we can reference it again.
5. Views of the layout are not accessible until they are inflated by setContentView
6.What is lateinit?
Answer: lateinit keyword here promises the kotlin compiler that variable will be initialized before calling any operation over it.
9. What are the duties of gradle?
Answer:
- Describing what devices app is built to run on
- Compiling code and resources into executable code
- Decalaring and maintaining dependencies
- Siging apps
- Running automated tests
- When you click the run button a series of gradle commands compiles your source code and dependencies and any associated resources into Android Application package or apk.
10. What is APK?
Answer: An apk is a file format used to distribute and install Android applications. After gradle builds the apk, Android studio transfers and installs the apk to the android device.
11:Project contains 2 types of gradle files: Project wide gradle file and gradle file for each module of the project.
12. These two lines of code define repositories available for this entire project
google()
mavenCentral()
Repositories are remote server from where any external code will be downloaded from.
What is Gradle?
Gradle is a generic build tool so it doesn't automatically know how to build android project or kotlin files which is why two dependencies in project level gradle files are pretty important. These are where you can download all the gradle scripts to build android kotlin android apps. These scripts are part of gradle plugin.
What are gradle plugins mentioned at the top of the gradle file?
Plugins mentioned at the top of build.gradle file in the app level gradle file. These plugin are needed by gradle to know how to build these android kotlin projects.
What is compileSdk and targetSdk versions?
compileSdk version is the api version you app is compiled against. So if you end up using a feature which were released in android 28 and higher apis, your compileSdk version should be at least that high
targetSdk version doesn't actually affects anything about how your app is compiled but it does imply the versions you tested your app on. This implies that you have tested your app versions 19 to 28.
Generally we should try to keep compileSdk and targetSdk to latest.
What are Vector Drawables
These are the xml files that are in the drawable folder. Vector drawables can scale without using quality. They are supported in api 21+.
Part of the build process is that gradle is generating a bunch of png files that are used on any of the devices below 21. These extra png files are going to make app size larger.
There is androidx compatiblity library for vector drawables all the way back to api level 7. For this we need to add vector support to build.gradle file and add new namespace to your layout. Change imageview to use srcCompat rather that src.
vectorDrawables.useSupportLibrary = true
NameSpaces
Namespaces helps in resolving ambiguity when attributes are having the same name.
The android namespace is the namespace for all the attributes that come as part of the core android framework. App namespace here is the namespace for attributes that come either from your custom code or libraries and not from the core android framework.
tools namespace is used when you want to define dummy content which will only be used when we are previewing the app in the preview pane. attributes using the tools namespace will actually be removed when you actually compile the app
What are views??
In Android all the visual elements that make up a screen are views are all children of view class. They share a lot of properties.
What is dp??
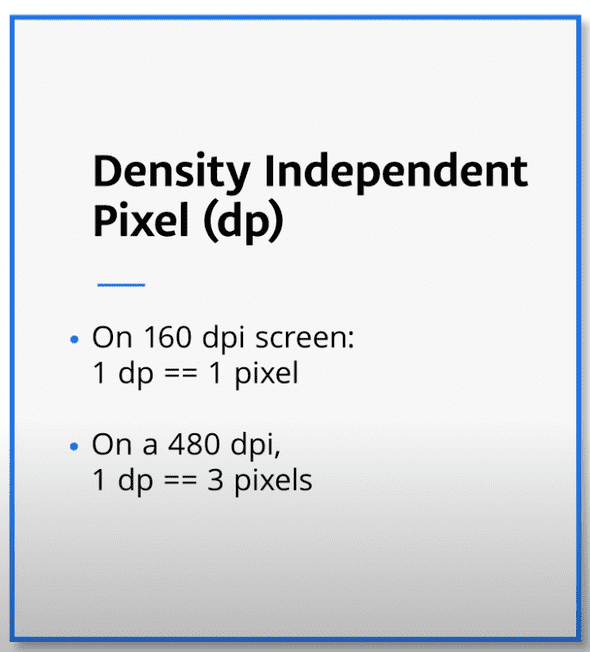
dp is a abstract unit that is based on physical pixel density of the screen.
Issue with deeply nested views in layout
Views in our layout are inflated to create a hierarchy of view objects. When Android system creates and draws the view hierarchy, it is traversed sometimes multiple times to calculate where every view needs to go taking into account each view size, location and other constraints. The deeper the hierarchy is the more work system has to do to calculate layout.
When constraintlayout is used??
Constraint layout is best for arranging small number of views or viewgroups in a complex layout.
What is sp??
sp stands for Scale independent pixels but it is not only scaled by the pixel density but also by the font size preference that the user can set in the settings.
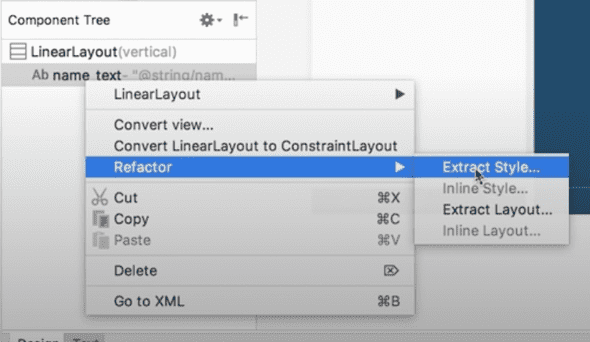
How to centralize style
Instead of repeating ourselves, we can extract and collect all the formatting of view into a style and then set the style to our views.
What is content description for ImageView??
Content description is used by screen readers to describe images
What is the use of giving id to a scroll view??
The reason for this is to give Android system an identifier for the view and if you rotate the screen the scroll position will be preserved.
How many elements a scrollview can contain??
1
Start and end because they adapt to right to left screens such as Arabic
Add some spacing between the lines using the lineSpacingMultiplier property to the TextView.
1android:lineSpacingMultiplier="1.2"/>
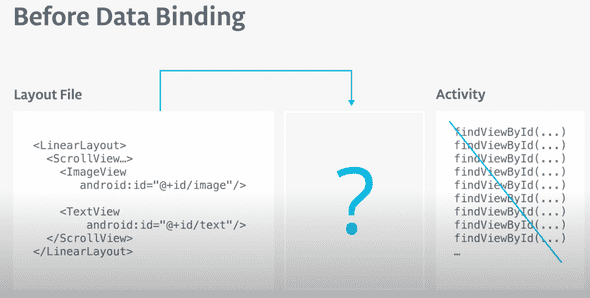
Using findViewById to get reference to views
Everytime we search for view in this way after it has been created or recreated, Android has to traverse the view hierarchy to find it for us at runtime.For a large deep view hierarchy it can take enough time that it can slow down the app for the user.
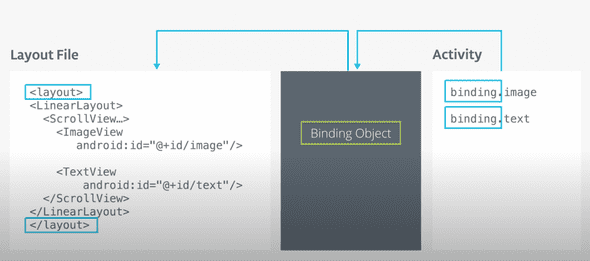
To fix this there is technique called Data Binding that allows us to connect a layout to an activity or Fragment at compile time. The compiler generates a helper class called a binding class when the activity is created, so is an instance of the binding class. Then we can access the view through this generated binding class without any extra overhead.
Before Data Binding
After Data Binding
For data binding we need to first enable it in gradle, then we need to wrap our xml layout into layout tag.
1dataBinding {2enabled = true3}
This generated binding object is like a glue between a layout and its view and the data. The type of binding, the ActivityMainBinding class is created by compiler specifically for this MainActivity. And the name is derived from the name of the layout file that is AcitivtyMain plus Binding.
We need to replace setContentView with an instruction to create a binding object with all the magic that connects the layout with the Activity. We imported DataBindingUtil into our class.
1binding = DataBindingUtil.setContentView(this, R.layout.activity_main)
In order to refresh the UI with the new Data we need to invalidate all binding expressions so they get recreated with correct data.
1invalidateAll()
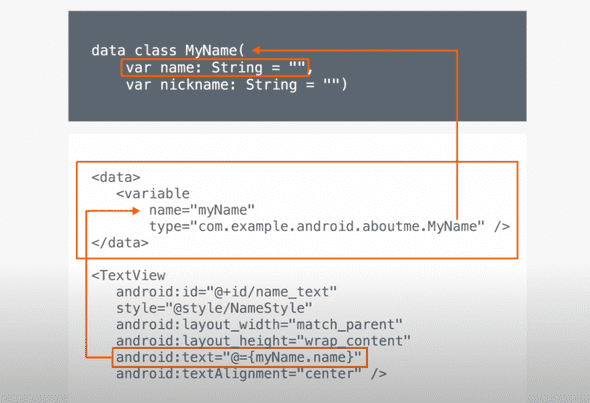
Bind data to views
To let our layout know about the data we create a data block in the xml. Then we add a variable block for our variable. The variable needs a name and type which is a fully qualified name of the data class we just created.
- The big idea about data binding is to create an object that connects/maps/binds two pieces of distant information together at compile time, so that you don't have to look for it at runtime.
- The object that surfaces these bindings to you is called the Binding object. It is created by the compiler, and while understanding how it works under the hood is interesting, it is not necessary to know for basic uses of data binding.
- With data binding enabled, the compiler creates references to all views in a
layouttag that have an id, and gathers them in a Binding object. - In your code, you create an instance of the binding object, and then reference views through the binding object with no extra overhead.
In Android studio we want auto-connect to be turned off because we are going to add constraints manually.
We can set default margin to 16dp. This does 2 things new views are created with this margin so that we don't have to manually add it
If you don't specify position for a view it always appear at 0, 0 of parent
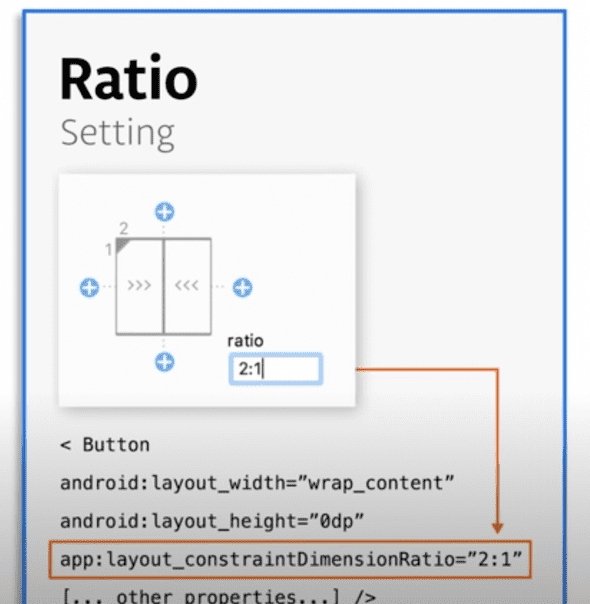
layout_constraintDimensionRatio
Here view will be twice as wide as height
Overview of Navigation
The Navigation Component consists of three key parts, working together in harmony. They are:
Navigation Graph (New XML resource) - This is a resource that contains all navigation-related information in one centralized location. This includes all the places in your app, known as destinations, and possible paths a user could take through your app.NavHostFragment (Layout XML view)- This is a special widget you add to your layout. It displays different destinations from your Navigation Graph.NavController (Kotlin/Java object)- This is an object that keeps track of the current position within the navigation graph. It orchestrates swapping destination content in the NavHostFragment as you move through a navigation graph.
Navigation destination in Jetpack Navigation
A destination is any place you can navigate to in your app, usually a fragment or an activity. These are supported out of the box, but you can also make your own custom destination types if needed.
app:defaultNavHost="true" connect the system back button to the NavHostFragment
This means that the system will intercept the system back button. We have to set this explicitly because you can have multiple simutaneous navigation hosts and you want only one of the Navhosts to handle back.
Note that you pass in either a destination or action ID to navigate.
How to get a NavController object
There are a few ways to get a NavController object associated with your NavHostFragment. In Kotlin, it's recommended you use one of the following extension functions, depending on whether you're calling the navigation command from within a fragment, activity or view:
- Fragment.findNavController()
- View.findNavController()
- Activity.findNavController(viewId: Int)
NavController is powerful
NavController is powerful because when you call methods like navigate() or popBackStack(), it translates these commands into the appropriate framework operations based on the type of destination you are navigating to or from. For example, when you call navigate() with an activity destination, the NavController calls startActivity() on your behalf.
IllegalStateException
Your NavController is associated with a NavHostFragment. Thus whichever method you use, you must be sure that the fragment, view, or view ID is either a NavHostFragment itself, or has a NavHostFragment as a parent. Otherwise you will get an IllegalStateException.
Navigation by actions
Navigation by actions has the following benefits over navigation by destination:
- You can visualize the navigation paths through your app
- Actions can contain additional associated attributes you can set, such as a transition animation, arguments values, and backstack behavior
- You can use the plugin safe args to navigate, which you'll see shortly
Actions allow you to attach NavOptions in the navigation XML file, rather than specifying them programmatically.
Safe Args
The navigation component has a Gradle plugin, called safe args, that generates simple object and builder classes for type-safe access to arguments specified for destinations and actions.
Using the argument tag, safeargs generates a class called FlowStepFragmentArgs.
Safe Args Direction classes
You can also use safe args to navigate in a type safe way, with or without adding arguments. You do this using the generated Directions classes.
Directions classes are generated for every distinct destination with actions. The Directions class includes methods for every action a destination has.
Note that in your navigation graph XML you can provide a defaultValue for each argument. If you do not then you must pass the argument into the action, as shown
If NavigationUI finds a menu item with the same ID as a destination on the current graph, it configures the menu item to navigate to that destination
How SharedViewModel works??
private val sharedViewModel: OrderViewModel by activityViewModels()
What are Kotlin scope functions
The Kotlin standard library contains several functions whose sole purpose is to execute a block of code within the context of an object. When you call such a function on an object with a lambda expression provided, it forms a temporary scope. In this scope, you can access the object without its name. Such functions are called scope functions. There are five of them: let, run, with, apply, and also.
There are mainly two differences among these functions:
- Way of referring to a context object (i.e. using either ‘this’ or ‘it’ keyword)
- return value (i.e. returns either ‘context object’ or ‘lambda result’). Context object refers to the object on which we are using the scope functions.
let function is often used to provide null safety calls. It executes the block only with the non-null value.
apply as the name implies – “Apply these to the object”. It can be used to operate on members of the receiver object mostly to initialize members.
also It is used where we have to perform additional operations when we have initialized the object members.
1fun main() {2 val list = mutableListOf<Int>(1, 2, 3)34 list.also {5 it.add(4)6 it.remove(2)7 }8 println(list)9}
Recommended use of with for calling functions on context objects without providing the lambda result.
apply and also functions return the context object itself.
If we write any expression at the end of the code block, it becomes the return value for the scope function. Return value for let, run, and with functions is the lambda result
What are kotlin delegations
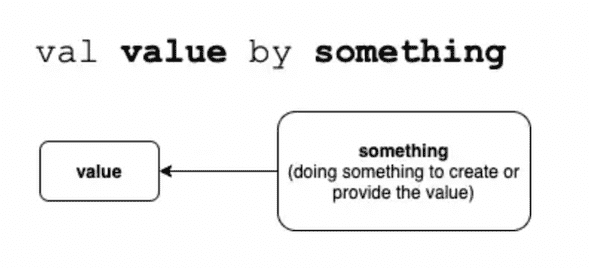
A delegate is just a class that provides the value for a property and handles its changes.
1class TrimDelegate : ReadWriteProperty<Any?, String> {23 private var trimmedValue: String = ""45 override fun getValue(6 thisRef: Any?,7 property: KProperty<*>8 ): String {9 return trimmedValue10 }1112 override fun setValue(13 thisRef: Any?,14 property: KProperty<*>, value: String15 ) {16 trimmedValue = value.trim()17 }18}
What is by keyword
::param is an operator that returns an instance of KProperty class for the property.
What is special about data class Kotlin?
Compiler automatically creates the equals, hashCode, toString, and copy functions.
Differences between data classes and normal classes.
- A data class must be declared with at least one primary constructor parameter which must be declared with val or var. A normal class can be defined with or without a parameter in its constructor.
- Data classes have default implementations for the following methods using only properties that were declared in the primary constructor; toString(), hashCode(), copy(), componentN(), equals(). Implementation for those methods can be written in normal classes using properties that were and were not declared in the primary constructor.
- A data class cannot be extended by another class. They are final classes by default. Normal classes can be extended by other classes, including data classes. Certain conditions should however be met.
- Data classes cannot be sealed, open, abstract or inner. Normal classes can be any of these.
Design Patterns in Kotlin?
Singleton
1object Singleton{2 fun doSomething(){}3}
Factory Pattern
Whenever we need a handy way to create objects that could of multiple similar type then you would want to use Factory pattern.
1enum class DialogType{2 Dialog_Create_Chat,3 Dialog_Delete_Message,4 Dialog_Edit_Message5}67sealed class Dialog{8 object CreateChatDialog : Dialog()9 object DeleteMessageDialog : Dialog()10 object EditMessageDialog : Dialog()11}1213object DialogFactory{14 fun createDialog(dialogType: DialogType): Dialog{15 return when(dialogType){16 DialogType.Dialog_Create_Chat -> Dialog.CreateChatDialog17 DialogType.Dialog_Delete_Message -> Dialog.DeleteMessageDialog18 DialogType.Dialog_Edit_Message -> Dialog.EditMessageDialog19 }20 }21}
builder pattern
This is more a java way way of doing things. In Kotlin we have named parameters and default values.
1class hamburger private constructor(val cheese: Boolean, val capsicum: Boolean, val onions: Boolean){2 class Builder{3 private var cheese: Boolean = true;4 private var capsicum: Boolean = false;5 private var onions: Boolean = false;67 fun cheese(value:Boolean) = apply{8 cheese = value;9 }1011 fun capsicum(value:Boolean) = apply{12 capsicum = value;13 }1415 fun onions(value:Boolean) = apply{16 onions = value;17 }1819 fun build = Hamburger(cheese, capsicum, onion)20 }21}2223val ham =Hamburger.builder().cheese(false).capsicum(true).onions(true).build()
Facade pattern
this basically hides code that you don't need to see or rather to only show code that you should see.
1@Get()2suspend fun getHamburgers(): List<Hamburger>
Dependency injection
Adapter pattern
How viewmodel survives configuration change
ViewModels created with ViewModelProviders.of() or by viewmodels() method are stored in ViewModelStore hashmap. For activities, this logic is straightforward. ViewModelStore is stored using onRetainNonConfigurationInstance method:
NonConfigurationInstances
Clears internal storage and notifies ViewModels that they are no longer used.
1public final void clear() {2 for (ViewModel vm : mMap.values()) {3 vm.onCleared();4 }5 mMap.clear();6}
Services vs threads
A service is simply a component that can run in the background, even when the user is not interacting with your application, so you should create a service only if that is what you need.
If you must perform work outside of your main thread, but only while the user is interacting with your application, you should instead create a new thread. For example, if you want to play some music, but only while your activity is running, you might create a thread in onCreate(), start running it in onStart(), and stop it in onStop().
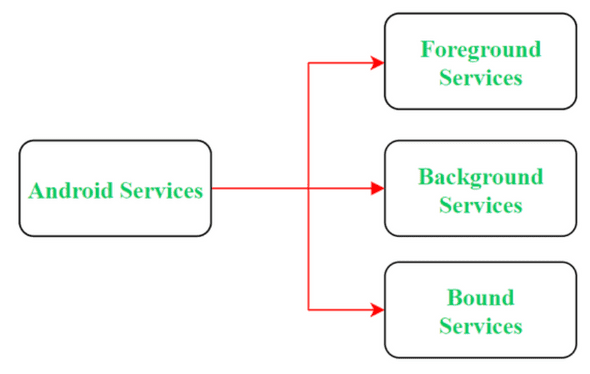
Services in Android
A Service is an application component that can perform long-running operations in the background. It does not provide a user interface. Once started, a service might continue running for some time, even after the user switches to another application. Additionally, a component can bind to a service to interact with it and even perform interprocess communication (IPC). For example, a service can handle network transactions, play music, perform file I/O, or interact with a content provider, all from the background.
A service runs in the main thread of its hosting process; the service does not create its own thread and does not run in a separate process unless you specify otherwise. You should run any blocking operations on a separate thread within the service to avoid Application Not Responding (ANR) errors.
Foreground
A foreground service performs some operation that is noticeable to the user. For example, an audio app would use a foreground service to play an audio track. Foreground services must display a Notification. Foreground services continue running even when the user isn't interacting with the app.
When you use a foreground service, you must display a notification so that users are actively aware that the service is running. This notification cannot be dismissed unless the service is either stopped or removed from the foreground.
The WorkManager API offers a flexible way of scheduling tasks, and is able to run these jobs as foreground services if needed. In many cases, using WorkManager is preferable to using foreground services directly.
Background
A background service performs an operation that isn't directly noticed by the user. For example, if an app used a service to compact its storage, that would usually be a background service.
Note: If your app targets API level 26 or higher, the system imposes restrictions on running background services when the app itself isn't in the foreground. In most situations, for example, you shouldn't access location information from the background. Instead, schedule tasks using WorkManager.
Bound
A service is bound when an application component binds to it by calling bindService(). A bound service offers a client-server interface that allows components to interact with the service, send requests, receive results, and even do so across processes with interprocess communication (IPC). A bound service runs only as long as another application component is bound to it. Multiple components can bind to the service at once, but when all of them unbind, the service is destroyed.
Your service can work both ways—it can be started (to run indefinitely) and also allow binding. It's simply a matter of whether you implement a couple of callback methods: onStartCommand() to allow components to start it and onBind() to allow binding.
Regardless of whether your service is started, bound, or both, any application component can use the service (even from a separate application) in the same way that any component can use an activity—by starting it with an Intent. However, you can declare the service as private in the manifest file and block access from other applications
To create a service, you must create a subclass of Service or use one of its existing subclasses. In your implementation, you must override some callback methods that handle key aspects of the service lifecycle and provide a mechanism that allows the components to bind to the service, if appropriate. These are the most important callback methods that you should override:
onStartCommand()
The system invokes this method by calling startService() when another component (such as an activity) requests that the service be started. When this method executes, the service is started and can run in the background indefinitely. If you implement this, it is your responsibility to stop the service when its work is complete by calling stopSelf() or stopService(). If you only want to provide binding, you don't need to implement this method.
onBind()
The system invokes this method by calling bindService() when another component wants to bind with the service. In your implementation of this method, you must provide an interface that clients use to communicate with the service by returning an IBinder. You must always implement this method; however, if you don't want to allow binding, you should return null.
onCreate()
The system invokes this method to perform one-time setup procedures when the service is initially created (before it calls either onStartCommand() or onBind()). If the service is already running, this method is not called.
onDestroy()
The system invokes this method when the service is no longer used and is being destroyed. Your service should implement this to clean up any resources such as threads, registered listeners, or receivers. This is the last call that the service receives.
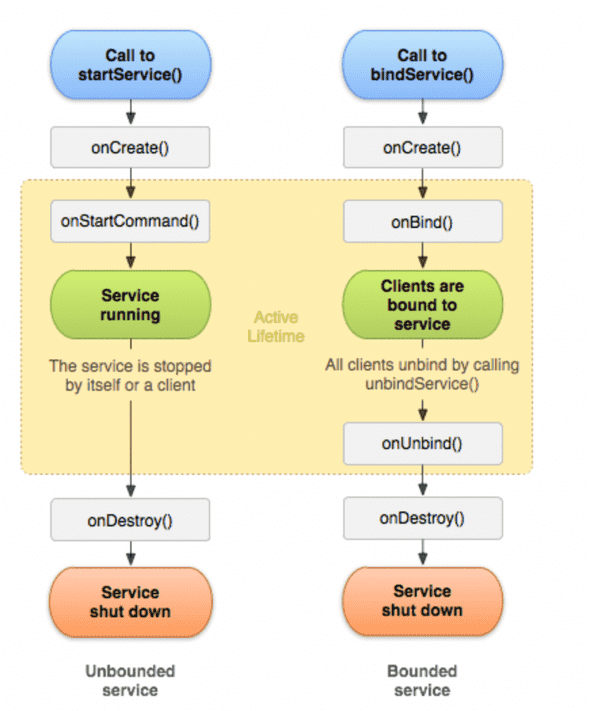
If a component starts the service by calling startService() (which results in a call to onStartCommand()), the service continues to run until it stops itself with stopSelf() or another component stops it by calling stopService().
If a component calls bindService() to create the service and onStartCommand() is not called, the service runs only as long as the component is bound to it. After the service is unbound from all of its clients, the system destroys it.
The Android system stops a service only when memory is low and it must recover system resources for the activity that has user focus. If the service is bound to an activity that has user focus, it's less likely to be killed; if the service is declared to run in the foreground, it's rarely killed. If the service is started and is long-running, the system lowers its position in the list of background tasks over time, and the service becomes highly susceptible to killing—if your service is started, you must design it to gracefully handle restarts by the system. If the system kills your service, it restarts it as soon as resources become available, but this also depends on the value that you return from onStartCommand().
Declaring a service in the manifest
You must declare all services in your application's manifest file, just as you do for activities and other components. After you publish your application, leave this name unchanged to avoid the risk of breaking code due to dependence on explicit intents to start or bind the service.
You can ensure that your service is available to only your app by including the android:exported attribute and setting it to false. This effectively stops other apps from starting your service, even when using an explicit intent.
1<service android:name=".ExampleService" />
The Android framework also provides the IntentService subclass of Service that uses a worker thread to handle all of the start requests, one at a time. Using this class is not recommended for new apps as it will not work well starting with Android 8 Oreo, due to the introduction of Background execution limits. Moreover, it's deprecated starting with Android 11. You can use JobIntentService as a replacement for IntentService that is compatible with newer versions of Android.
Notice that the onStartCommand() method must return an integer. The integer is a value that describes how the system should continue the service in the event that the system kills it. The return value from onStartCommand() must be one of the following constants:
START_NOT_STICKY
If the system kills the service after onStartCommand() returns, do not recreate the service unless there are pending intents to deliver. This is the safest option to avoid running your service when not necessary and when your application can simply restart any unfinished jobs.
START_STICKY
If the system kills the service after onStartCommand() returns, recreate the service and call onStartCommand(), but do not redeliver the last intent. Instead, the system calls onStartCommand() with a null intent unless there are pending intents to start the service. In that case, those intents are delivered. This is suitable for media players (or similar services) that are not executing commands but are running indefinitely and waiting for a job.
START_REDELIVER_INTENT
If the system kills the service after onStartCommand() returns, recreate the service and call onStartCommand() with the last intent that was delivered to the service. Any pending intents are delivered in turn. This is suitable for services that are actively performing a job that should be immediately resumed, such as downloading a file.
Creating a bound service
A bound service is one that allows application components to bind to it by calling bindService() to create a long-standing connection. It generally doesn't allow components to start it by calling startService().
Lifecycle of a service
What is handler
Handler provides just a way to execute some code on UI thread from Background/Worker thread.
Looper in Android
Looper is providing Thread an ability to run in a loop with its own MessageQueue.
How workmanager works even if app forced shutdown??
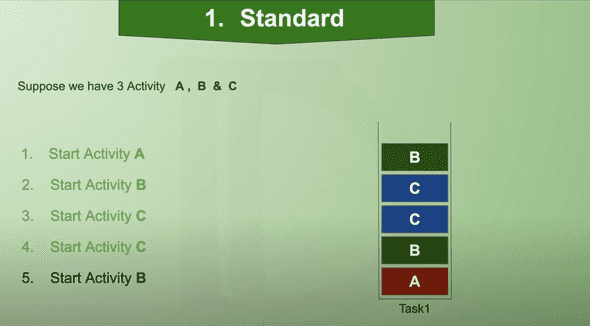
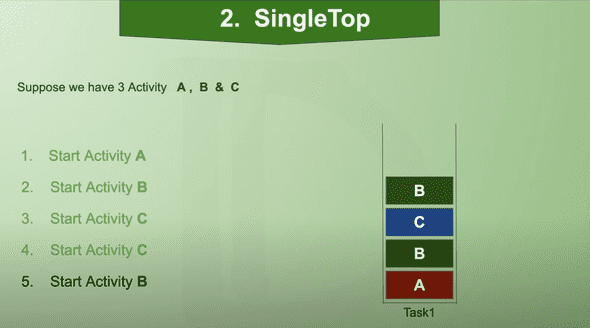
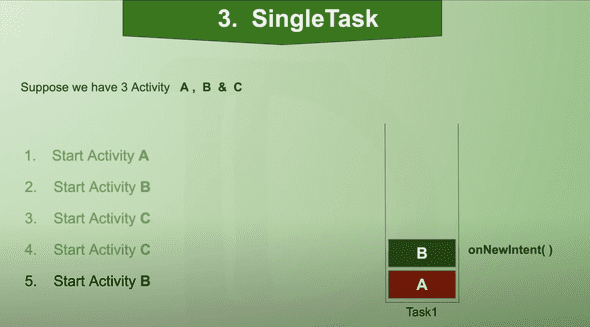
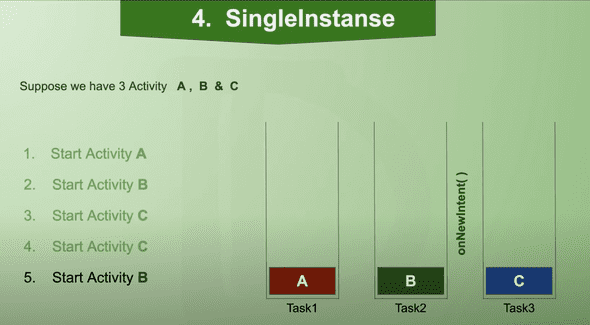
Launch Modes in Android
- Standart(Default)
- SingleTop
- SingleTask
- SingleInstance
Sealed classes vs Enum in Android??
In Kotlin, Sealed Classes can be termed as Enum classes on steroids. Sealed classes allow us to create instances with different types, unlike Enums which restrict us to use the same type for all enum constants.
1enum class DeliveryStatus(val trackingId: String?) {2 PREPARING(null),3 DISPATCHED("27211"),4 DELIVERED("27211"),5}
Drawback of enum is that it can only accept same type here which is string here. Enum classes allow only a single type of all constants.
1sealed class DeliveryStatus{2 class Preparing() : DeliveryStatus()3 class Dispatched(val trackingId: String) : DeliveryStatus()4 class Delivered(val trackingId: String, val receiversName: String) : DeliveryStatus()5}
Sealed classes allow multiple types
As we navigate through activities in Android
As we navigate through activities in Android, the previous activities from within the app as well as from previous apps are arranged in a stack that we call back stack. This back stack is ordered based upon the order in which each activity is opened.
Fragments have similar backstack like activity backstack
Fragments have similar backstack like activity backstack except that entire backstack is contained within the activity. All of this controlled by a class called FragmentManager. When a Fragment is instantiated by a class called FragmentManager, the fragment transaction can optionally be added to the Fragment BackStack.
Can 2 activities have launcher intent filter
Inflate and return the fragment layout.
In our Activity, we used DataBindingUtil.setContentView to get the binding class from a layout, but since we’re in a fragment we need to call DataBindingUtil.inflate
A navigation action can manipulate the back stack as it moves to the next destination
To make this action pop destinations off the back stack on our behalf we use pop behaviour attributes from the editor
Navigation controller has a UI library called Navigation UI
It integrates with the Action button to implement the correct behaviour for the up button
Activities have onSupportNavigateUp function that we can override to integrate nav controller to action bar
onSupportNavigateUp is where we need to navigation handle what happens when Up is pressed. Otherwise nothing will happen when we the up button
How to tell Android that current Fragment has menu
setHasOptionsMenu(true)
There are limited types that can be stored as value in a bundle
Primitive types like char, int, floor along with various types of arrays, char sequence and a few data classes such as array lists.
There is no wayt o gaurantee what you passed into Fragment A is what recipient asks for on the other end
Safe args
Safe Args is gradle plugin that generates code to help gaurantee that arguments on both sides match up.
Intent Action
Actions are used in Intents to describe the type of thing that is to be done. COmmon actions are view, edit or delete
Implicit actions can include a data type such as text or a jpeg image which allows application to be chosen based on data types they can accept.
Intent filter
An intent filter is used to expose that your activity can respond to an implicit intent with a certain action, category and type
package manager
Its a android system service called the package manager which we can get from the activity. The package manager knows about every activity that is registered in the manifest accross every application so it can be used to see if our implicit intent will resolve to something.
Navigation drawer
The Navigation drawer is part of the material library, A library used to implement patterns that are prt of google material design.
1implementation "com.google.android.material:material:$version_material"
NavController listener
1navController.addOnDestinationChangedListener { nc: NavController, nd: NavDestination, args: Bundle? ->2 if (nd.id == nc.graph.startDestination) {3 drawerLayout.setDrawerLockMode(DrawerLayout.LOCK_MODE_UNLOCKED)4 } else {5 drawerLayout.setDrawerLockMode(DrawerLayout.LOCK_MODE_LOCKED_CLOSED)6 }7}
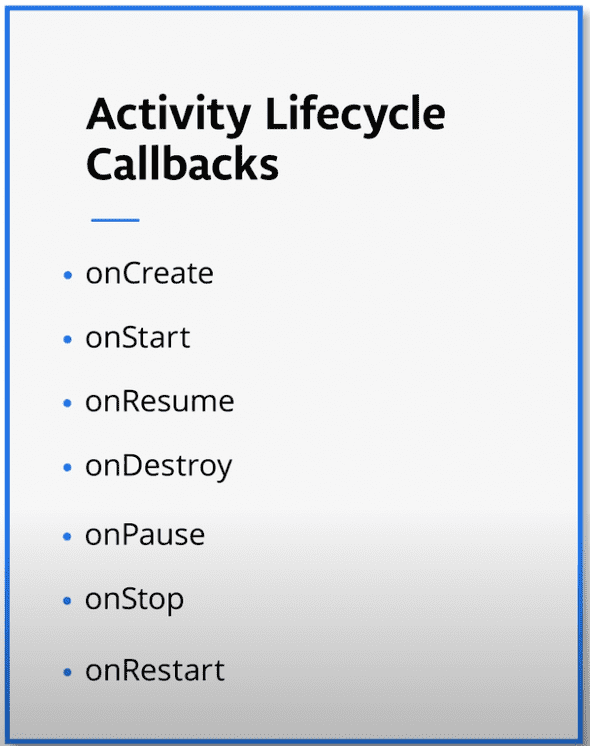
Activity LifeCycle Callbacks
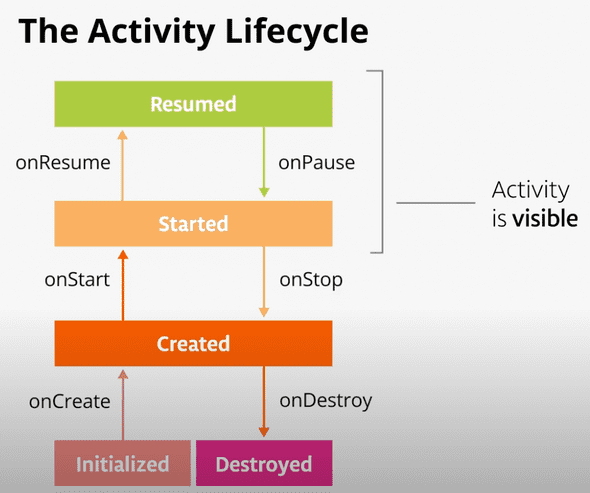
onDestroy means activity can be fully shutdown and could be garbage collected
Garbage collection
this refers to the automatic cleanup of objects that you are no longer going to use.
Activity lifecycle
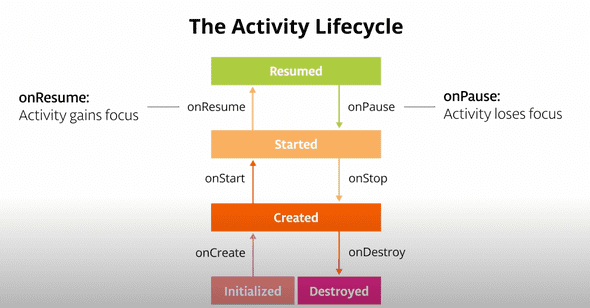
onStart is called when the activity becomes visible. onStop is called when the activity goes off screen.
OnResume and onPause
onResume is called when activity has focus and onPause is called when activity loses focus.
Whatever code runs in onPause blocks other things from displaying so its important to keep the callback code lightweight. Putting blocking code in onPause might actually delay the incoming phone call notification.
onStart and onStop
Use onStart and onStop to start and stop anything that should run only when the activity is actually on-screen.
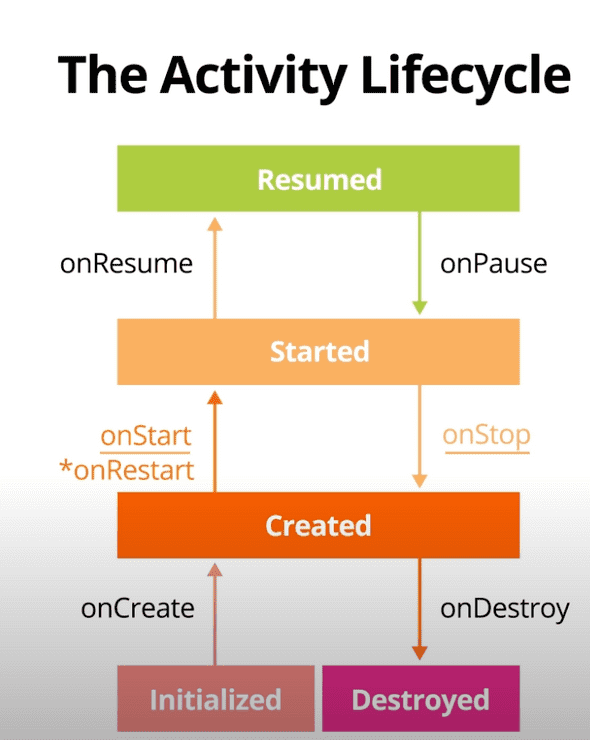
onRestart()
onCreate or onRestart will be called before activity gets visible. onCreate is called the first time and then onRestart is called once the activity is already created. onRestart is used when you only want to call something if your activity is npt being started for the first time.
Activity Lifecycle Callbacks
onCreate: This is called the first time the activity starts and is therefore only called once during the lifecycle of the activity. It represents when the activity is created and initialized. The activity is not yet visible and you can't interact with it. You must implement onCreate. In onCreate you should:
Inflate the activity's UI, whether that's using findViewById or databinding. Initialize variables. Do any other initialization that only happens once during the activity lifetime.
onStart: This is triggered when the activity is about to become visible. It can be called multiple times as the user navigates away from the activity and then back. Examples of the user "navigating away" are when they go to the home screen, or to a new activity in the app. At this point, the activity is not interactive. In onStart you should:
Start any sensors, animations or other procedures that need to start when the activity is visible.
onResume: This is triggered when the activity has focus and the user can interact with it.
Start any sensors, animations or other procedures that need to start when the activity has focus (the activity the user is currently interacting with).
onPause: This method is called as soon as the activity loses focus and the user can't interact with it. An activity can lose focus without fully disappearing from the screen (for example, when a dialog appears that partially obscures the activity).
Stop any sensors, animations or other procedures that should not run when the activity doesn't have focus and is partially obscured. Keep execution fast. The next activity is not shown until this completes.
onStop: It is called when you can no longer see the activity.
Stop any sensor, animations or other procedures that should not run when the activity is not on screen. You can use this to persist (permanently save) data. Stop logic that updates the UI. This should not be running when the activity is off-screen; it's a waste of resources. There are also restrictions as soon as the app goes into the background, which is when all activities in your app are in the background.
onDestroy: It is called once when the activity is fully destroyed. This happens when you navigate back out of the activity (as in press the back button), or manually call finish(). It is your last chance to clean up resources associated with the activity. Here you should:
Tear down or release any resources that are related to the activity and are not automatically released for you. Forgetting to do this could cause a memory leak! Logic that refers to the activity or attempts to update the UI after the activity has been destroyed could crash the app!
Fragment Callbacks
onCreate: Similar to the Activity’s onCreate callback. This is when the fragment is created. This will only get called once. Here you should:
Initialize anything essential for you fragment. DO NOT inflate XML, do that in onCreateView, when the system is first drawing the fragment NOT reference the activity, it is still being created. Do this in onActivityCreated.
onCreateView: This is called between onCreate and onActivityCreated. when the system will draw the fragment for the first time when the fragment becomes visible again. You must return a view in this callback if your fragment has a UI. Here you should:
Create your views by inflating your XML.
onStop: Very similar to Activity’s onStop. This callback is called when the user leaves your fragment. Here you should: Save any permanent fragment state.
onAttach: When the fragment is first attached to the activity. This is only called once during the lifecycle of the fragment.
onActivityCreated: Called when the activity onCreate method has returned and the activity has been initialized. If the fragment is added to an activity that's already created, this still gets called. It's purpose is to contain any code the requires the activity exists and it is called multiple times during the lifecycle of the fragment. Here you should:
Execute any code that requires an activity instance
onStart: Called right before the fragment is visible to the user.
onResume: When the activity resumes the fragment. This means the fragment is visible, has focus and is running.
onStop: Called when the Activity’s onStop is called. The fragment no longer has focus.
onDestroyView: Unlike activities, fragment views are destroyed every time they go off screen. This is called after the view is no longer visible.
Do not refer to views in this callback, since they are destroyed
onDestroy: Called when the Activity’s onDestroy is called.
onDetach: Called when the association between the fragment and the activity is destroyed.
object keyword in Kotlin
Alarm Manager in Android
AlarmReceiver(BroadcastReceiver) and add to manifest and setting pending intent for AlarmReceiver and launch it
Job scheduler in Android
AndroidSchedular extends JobService and add service manifest
How viewmodel is lifecycle aware
1UserModel userModel = new ViewModelProvider(this).get(UserModel.class);
this refers to an instance of lifecycleOwner
How livedata works internally
what happens if we don't mention manager in recyclerview
Adaptive Icons
Splash Screen API
Create a mulit-module Android project
Cold Start vs Warm Start vs Hot Start
Cold start
A cold start refers to an app’s starting from scratch: the system’s process has not, until this start, created the app’s process. Cold starts happen in cases such as your app’s being launched for the first time since the device booted, or since the system killed the app. This type of start presents the greatest challenge in terms of minimizing startup time, because the system and app have more work to do than in the other launch states.
At the beginning of a cold start, the system has three tasks. These tasks are:
- Loading and launching the app.
- Displaying a blank starting window for the app immediately after launch.
- Create the app process.
As soon as the system creates the app process, the app process is responsible for the next stages:
- Creating the app object.
- Launching the main thread.
- Creating the main activity.
- Inflating views.
- Laying out the screen.
- Performing the initial draw.
Warm start
A warm start encompasses some subset of the operations that take place during a cold start; at the same time, it represents more overhead than a hot start. There are many potential states that could be considered warm starts. For instance:
The user backs out of your app, but then re-launches it. The process may have continued to run, but the app must recreate the activity from scratch via a call to onCreate().
The system evicts your app from memory, and then the user re-launches it. The process and the activity need to be restarted, but the task can benefit somewhat from the saved instance state bundle passed into onCreate().
Broadcast receiver
A broadcast receiver (receiver) is an Android component which allows you to register for system or application events. All registered receivers for an event are notified by the Android runtime once this event happens.
For example, applications can register for the ACTION_BOOT_COMPLETED system event which is fired once the Android system has completed the boot process.
Life cycle of a broadcast receiver
After the onReceive() of the receiver class has finished, the Android system is allowed to recycle the receiver.
How to add android views in composables
1AndroidView(factory = { ctx ->23 // Initialize a View or View hierarchy here45 ImageView(ctx).apply {6 val drawable = ContextCompat.getDrawable(ctx, R.drawable.composelogo)7 setImageDrawable(drawable)8 }9})
What is Android KTX
Android KTX is a set of Kotlin extensions that are included with Android Jetpack and other Android libraries. KTX extensions provide concise, idiomatic Kotlin to Jetpack, Android platform, and other APIs. To do so, these extensions leverage several Kotlin language features.
for example:
1implementation("androidx.lifecycle:lifecycle-viewmodel-ktx:2.5.1")
Private Inner class in Kotlin
A nested class marked as inner can access the members of its outer class. Inner classes carry a reference to an object of an outer class.
Create your own LiveData implementation
1package com.anish.createlivedatafromscratch23import androidx.lifecycle.Lifecycle4import androidx.lifecycle.LifecycleObserver5import androidx.lifecycle.LifecycleOwner6import androidx.lifecycle.OnLifecycleEvent78class MyOwnLiveData<T> {910 private var dataHolder: T? = null11 private val hashMapOfObservers: HashMap<(T?) -> Unit, LifeCycleObserverWrapper> = HashMap()1213 fun postValue(value: T) {14 dataHolder = value15 hashMapOfObservers.values.forEach {16 if (it.lifecycleOwner.lifecycle.currentState.isAtLeast(Lifecycle.State.STARTED)) {17 it.observer.invoke(dataHolder)18 }19 }20 }2122 fun getValue() = dataHolder2324 fun addObserver(lifecycleOwner: LifecycleOwner, observer: (T?) -> Unit) {25 LifeCycleObserverWrapper(lifecycleOwner, observer).apply {26 this.lifecycleOwner.lifecycle.addObserver(this)27 hashMapOfObservers[observer] = this28 }2930 }3132 fun removeObserver(observer: (T?) -> Unit) {33 hashMapOfObservers[observer]?.run {34 this.lifecycleOwner.lifecycle.removeObserver(this)35 }36 }3738 fun updateValue(observer: (T?) -> Unit) {39 observer.invoke(dataHolder)40 }4142 private inner class LifeCycleObserverWrapper(43 val lifecycleOwner: LifecycleOwner, val observer: (T?) -> Unit44 ) : LifecycleObserver {4546 @OnLifecycleEvent(Lifecycle.Event.ON_START)47 fun doOnStart() {48 updateValue(observer)49 }5051 @OnLifecycleEvent(Lifecycle.Event.ON_RESUME)52 fun doOnResume() {53 updateValue(observer)54 }5556 @OnLifecycleEvent(Lifecycle.Event.ON_DESTROY)57 fun doOnDestroy() {58 removeObserver(observer)59 }60 }61}
What is internal variable in Kotlin
Setting a declaration as internal means that it’ll be available in the same module only. By module in Kotlin, we mean a group of files that are compiled together.
How to make Network calls without Retrofit
Here we are using HttpURLConnection and Gson serializer.
inline function
Inlining is basically requesting the compiler to copy the (inlined) code at the calling place.
In Kotlin, the higher order functions or lambda expressions, all stored as an object which takes some memory and might increase the memory overhead. Sometimes, the function does a very basic functionality that passing the control is not even worth but as it (the function) is being used at multiple places, we need to create a separate function. To reduce the memory overhead of such functions we can use the inline keyword which ultimately requests the CPU to not allocate any memory for the function and simply copy the body of that function at the calling place.
Things to keep in mind
We will lose access to any private variable or function of the class inside the inline function. So it’s better to make functions inline which are very generic and don’t use a class level variable or function to achieve their functionality.
1private var localVariable : Int = 82inline fun isMultipleOf (number: Int, multipleOf : Int): Boolean {3 print(localVariable) //compilation error4 return number % multipleOf == 05}
Do not inline for bigger functions as it degrades the performance.
Reified Type Parameters
Sometimes we need to access the type of parameter passed during the call. We have to simply pass the parameter at the time of function calling and we can retrieve the type of the parameter using a reified modifier.
1fun main(args: Array<String>) {2 genericFunc<String>()3}45inline fun <reified T> genericFunc() {6 print(T::class)7}
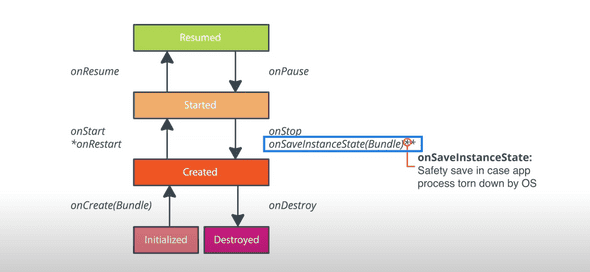
onSavedInstanceState is called when app goes into the background not when activity is restarting
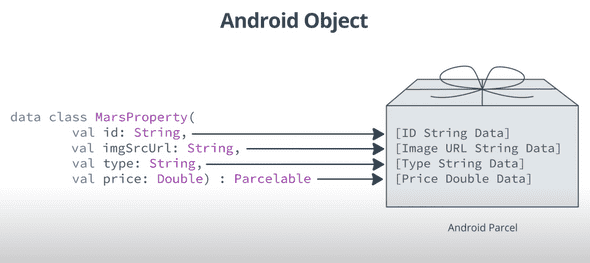
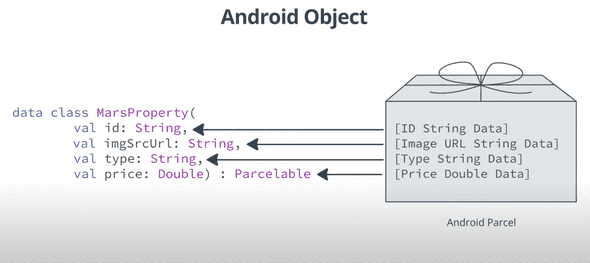
We should always call the super method of onSavedInstanceState because there is a lot of data that is automatically stored about activity. Beyond integers there are lot of things you can put into your bundle. And if you want to put an arbitrary object in that bundle, you can have object implement parcelable interface which basically defines way to serialize and deserialize data. Now since the system have this bundle in RAM, its best practice to keep this data thats actually in the bundle small. The size of the bundle is limited it varies from device to device. But generally you should store far less that 100kb. If you start to go over that amount of memory, you will risk crashing your app with the transaction too large exception.
When activity restarts due to process shutdown there are 2 things that will change. If your activity is starting fresh, this bundle in onCreate is null, so by that logic when bundle is not null you are re-creating the activity. onRestoreSavedInstanceState is also called. Now most of the time we are going to choose to restore activity state in onCreate. onRestoreSavedInstanceState is called after onStart.
Examples of configuration change
- user decides to change the language of their device
- if they plugin or remove a hardware keyboard
- user rotated device
Viewmodel preserve data with configuration changes
The viewmodel does preserve data with configuration changes but that data is still lost when the app is shut down by operating system.
Livedata is observable data holder class that is also life cycle aware
Livedata is aware about lifecycle state of its UI controller(Activity/Fragment) observers. LiveData will only update UI controllers that are actually on screen. So if your fragment goes off-screen and value of your LiveData changes, it would not update the off-screen fragment. When a UI controller goes from off-screen to on-screen though. LiveData will always trigger the observer with the most recent data. If UI controller gets destroyed, the liveData will internally cleanup its own connection with the observer.
binding.setLifeCycleOwner(this)
This peice of code allows mer to use livedata to automatically update my data binding layout
1android:text="@{gameviewmodel.word}"
we didn't use word.value. Due to data binding magic this will display the current value of the live data and if the value happends to be null it will display "".
How to combine liveData
MediatorLiveData & Transformation.map, Transformation.switchMap &
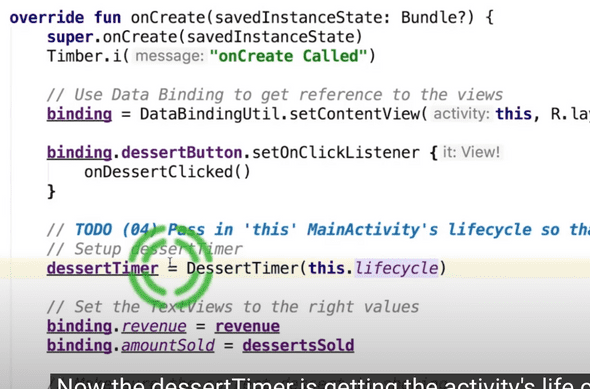
The lifecycle library introduced the Android lifecycle as an actual object
This object can be checked and querid for state. Llifecycle library also introduced lifecyclerowner and lifecycleobserver interfaces.
LifecycleOwner are anything that have a lifecycle
LifecycleObserver observe lifecycle of a lifecycleowner such as an activity
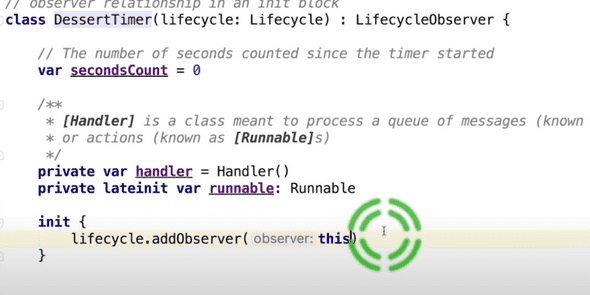
Make a class lifecycle observer
data class for Room db
1@Entity(tableName = "daily_sleep_quality_table")2data class SleepNight(3 @PrimaryKey(autoGenerate = true)4 var nightId: Long = 0L,56 @ColumnInfo(name = "start_time_milli")7 val startTimeMilli: Long = System.currentTimeMillis(),89 @ColumnInfo(name = "end_time_milli")10 var endTimeMilli: Long = startTimeMilli,1112 @ColumnInfo(name = "quality_rating")13 var sleepQuality: Int = -114)
We can assume that nights are in the table in the order inserted as this is not guaranteed
One of the amazing features of Room, that we can get back liveData
Room makes sure that this liveData is updated whenever the database is updated.
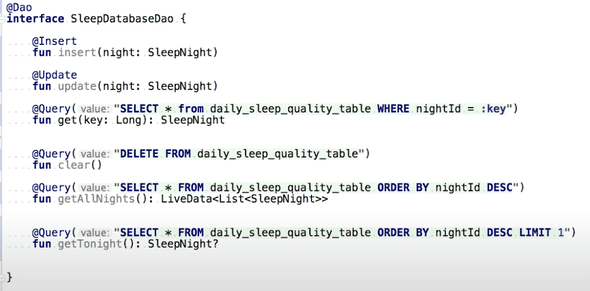
Example DAO
What are abstract classes
- We can’t create an object for abstract class.
- All the variables (properties) and member functions of an abstract class are by default non-abstract. So, if we want to override these members in the child class then we need to use open keyword.
- If we declare a member function as abstract then we does not need to annotate with open keyword because these are open by default.
- An abstract member function doesn’t have a body, and it must be implemented in the derived class.
Whenever you change the schema you will have to up the version number
If we forget to do this app won't work anymore.
Export schema in Room DB
export schema is true by default and saves the schema of the database to a folder, this provides you with a version history of your database which can be very helpful for complex database
We can have multiple Daos and tables
Companion objects allows clients to access methods for creating or getting the database without instantiating the class
What is volatile
this helps make sure the value of INSTANCE is always up sto date and the same for all execution threads. The value of the volatile variable will never be cached and all writes and reads will be done to and from main memory. It means that changes made by one thread to INSTANCE are visible to all other threads immediately. We don;t get a situation where say two threads each update the same entity in a cache and now we have a problem.
synchronized block
Multiple threads can ask for database instance at the same time leaving use 2 instead of 1. Wrapping our code into synchronized means only one thread of execution at a time can enter this block of code which makes sure that database only gets initialized once.
We need to pass ourselves into synchronized so that we have access to the context.
1@Database(entities = [SleepNight::class], version = 1, exportSchema = false)2abstract class SleepDatabase : RoomDatabase() {34abstract val sleepDatabaseDao: SleepDatabaseDao56companion object {78 @Volatile9 private var INSTANCE: SleepDatabase? = null1011 fun getInstance(context: Context): SleepDatabase {12 synchronized(this) {13 var instance = INSTANCE1415 if (instance == null) {16 instance = Room.databaseBuilder(17 context.applicationContext,18 SleepDatabase::class.java,19 "sleep_history_database"20 )21 .fallbackToDestructiveMigration()22 .build()23 INSTANCE = instance24 }25 return instance26 }27 }28 }29}
Merge tag
Merge tag can be used to eliminate redundant layouts when including layouts
AndroidViewModel
this class is same as ViewModel but it takes application context as parameter and makes it available as a property. AndroidViewModel provides Application context. If you need to use context inside your Viewmodel you should use AndroidViewModel (AVM), because it contains the application context. To retrieve the context call getApplication(), otherwise use the regular ViewModel (VM).
Why do we need ViewModelFactory
1// Create an instance of the ViewModel Factory.2val dataSource = SleepDatabase.getInstance(application).sleepDatabaseDao3val viewModelFactory = SleepTrackerViewModelFactory(dataSource, application)45// Get a reference to the ViewModel associated with this fragment.6val sleepTrackerViewModel =7 ViewModelProviders.of(8 this, viewModelFactory).get(SleepTrackerViewModel::class.java)
To pass custom params to viewmodel
Mobile devices have processors and these days most of them have multiple hardware processors that run each processes concurrently
This is called multi-processing. To use processors more efficiently the operating system can enable a application to create more than 1 process of execution within a process. This is called multi-threading.
Use facing application has a main thread that runs in foreground and can dispatch other threads that may run into background. Now on Android main thread is a single thread that handles all updates to the UI. Main thread calls all click handlers and other UI and life cycle callbacks. This is why it is also called the UI thread.
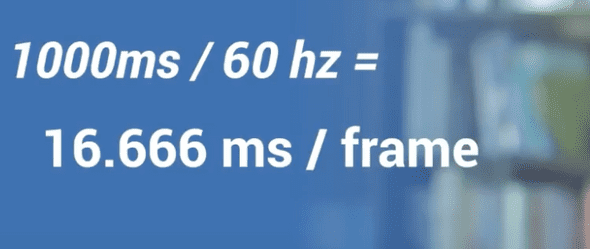
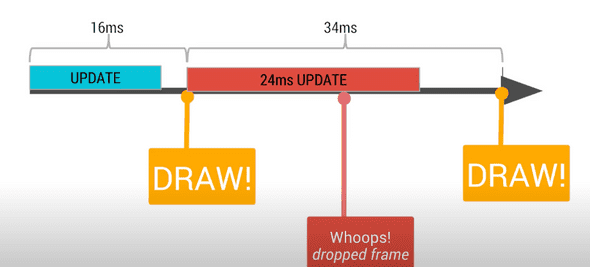
The main thread has to update the screen every 16ms.
Callbacks
A pattern for running long running tasks without blocking the main thread is callbacks. Callbacks doesn't allow the use of some language features such as exceptions
Coroutines
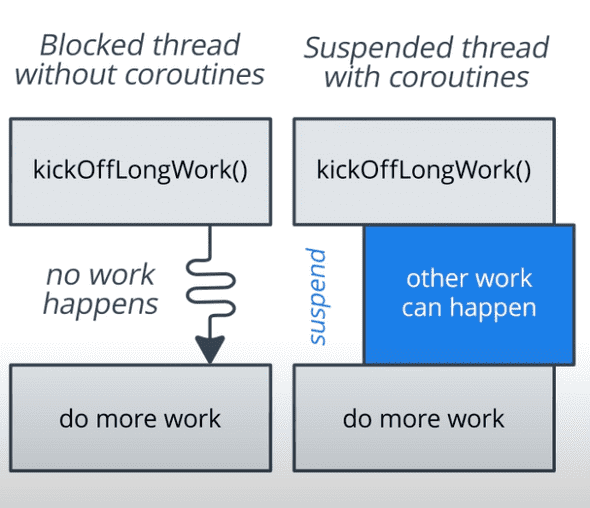
Coroutines run independently from the main execution steps of your program. This could be in parallel, on seperate processor but could be be that while rest of the app is waiting for input we sneak in a bit of processing
suspend keyword doesn't specify the thread code runs on. suspend functions can run on the main thread or the background thread.
job is anything that can be cancelled. All coroutines have a job and you can use it to cancel the coroutine. Jobs can be arranged into parent child hierarchy so that cancellation of a parent leads to cancellation of all its children
dispatchers sends off coroutines to run on various threads. Dispatchers.Main will run tasks on the main thread and Dispathers.IO for offloading blocking IO tasks to a shared pool of threads.
scope combines information including a job and a dispatcher to define the context in which coroutine runs.
Transformation.map
it is executed everytime night receives new data from the database.
1private val nights = database.getAllNights()23val nightsString = Transformations.map(nights) { nights ->4 formatNights(nights, application.resources)5}
In Kotlin return@label syntax is used for specifying which function among several nested ones this statement returns from
Coroutine pattern
we launch a coroutine in the main UI thread because the result affects the UI. Inside we call a suspended function to do the long running work so that we don't block the UI thread while waiting for the result. The long running work has nothing to do with the UI so we switch to the IO context so that we can run in a thread pool that is optimized and set aside for these operations
How to run coroutines in parallel
1import kotlinx.coroutines.*23suspend fun sendDataAndAwaitAcknowledge() = coroutineScope {4 awaitAll(async {5 awaitAcknowledge()6 }, async {7 sendData()8 })9}1011fun sendData() = true1213fun awaitAcknowledge() = false1415fun main() {16 runBlocking {17 println(sendDataAndAwaitAcknowledge()) // [false, true]18 }19}
1suspend fun sendDataAndAwaitAcknowledge() {2 val one = async { sendData() }3 val two = async { awaitAcknowledge() }4 println("The result is ${one.await() + two.await()}")5}
ViewStub
Sometimes your layout requires complex views that are rarely used. Whether they are item details, progress indicators, or undo messages, you can reduce memory usage and speed up rendering by loading the views only when they're needed.
You can defer loading resources when you have complex views that your app needs in the future by defining a ViewStub for complex and rarely used views.
1<ViewStub2 android:id="@+id/stub_import"3 android:inflatedId="@+id/panel_import"4 android:layout="@layout/progress_overlay"5 android:layout_width="fill_parent"6 android:layout_height="wrap_content"7 android:layout_gravity="bottom" />
When you want to load the layout specified by the ViewStub, either set it to visible by calling setVisibility(View.VISIBLE) or call inflate().
1findViewById<View>(R.id.stub_import).visibility = View.VISIBLE2// or3val importPanel: View = findViewById<ViewStub>(R.id.stub_import).inflate()
Note: The inflate() method returns the inflated View once complete, so you don't need to call findViewById() if you need to interact with the layout.
Once visible or inflated, the ViewStub element is no longer part of the view hierarchy. It is replaced by the inflated layout, and the ID for the root view of that layout is specified by the android:inflatedId attribute of the ViewStub. The ID android:id specified for the ViewStub is valid only until the ViewStub layout is visible or inflated.
A drawback of ViewStub is that it doesn’t currently support the merge tag in the layouts to be inflated.
include and merge tag
include is used to include the contents of reusable content. This is a very good idea of sharing the contents of another layout in the main layout.
1<include2 android:id="@+id/custom_layout"3 layout="@layout/custom_layout"4 android:layout_width="wrap_content"5 android:layout_height="wrap_content" />
The merge tag helps us to eliminate redundant view groups in our view hierarchy when including one layout within another
1<merge xmlns:android="http://schemas.android.com/apk/res/android">23 <Button4 android:id="@+id/ButtonToInclude"5 android:layout_width="fill_parent"6 android:layout_height="wrap_content"7 android:background="@color/colorPrimary"8 android:text="Button is under merge tag"9 android:textColor="#fff"10 android:textSize="18sp"11 android:textStyle="italic" />1213 <ImageView14 android:id="@+id/imageViewToInclude"15 android:layout_width="fill_parent"16 android:layout_height="wrap_content"17 android:src="@drawable/cryptocurrency" />1819</merge>
MediatorLiveData
Merge multiple LiveData sources into one. While the MediatorLiveData is a subclass of LiveData, it acts as LiveData itself. It allows us to merge multiple LiveData sources into one single LiveData which we then can observe.
1class MediatorLiveDataExample: ViewModel() {23 private val _liveDataOne = MutableLiveData<Int>()4 val liveDataOne: LiveData<Int> = _liveDataOne56 private val _liveDataTwo = MutableLiveData<Int>()7 val liveDataTwo: LiveData<Int> = _liveDataTwo89 val mediatorLiveData = MediatorLiveData<Int>()1011 init {12 mediatorLiveData.addSource(_liveDataOne, object : Observer<Int> {13 var invocationCount: Int = 01415 override fun onChanged(updatedValue: Int) {16 ++invocationCount1718 mediatorLiveData.value = updatedValue + 101920 if (invocationCount > 10) {21 mediatorLiveData.removeSource(_liveDataOne)22 }23 }24 })25 mediatorLiveData.addSource(_liveDataTwo) { updatedValue -> updatedValue + 10 }26 }27}
we then add one LiveData source by the traditional way of declaring an Observer and then overriding the onChange function.
In the second function, we use the lambda variation. The returned value will be the new value of the mediatorLiveData value.
Take a look at the first implementation. Here we remove the firstLiveData as soon as the invocationCount inside the Observer exceeds 10. Afterward, we will no longer get invocations for that LiveData.
The problem here is that this use-case is not possible with the original implementation of the MediatorLiveData. We can only merge LiveData sources of the same type.
PairMediatorLiveData
The PairMediatorLiveData is not more than a combination of LiveData sources that get automatically combined into one single LiveData source, which is represented as Kotlins Pair data type.
1import androidx.lifecycle.LiveData2import androidx.lifecycle.MediatorLiveData34class PairMediatorLiveData<F, S>(firstLiveData: LiveData<F>, secondLiveData: LiveData<S>) : MediatorLiveData<Pair<F?, S?>>() {5 init {6 addSource(firstLiveData) { firstLiveDataValue: F -> value = firstLiveDataValue to secondLiveData.value }7 addSource(secondLiveData) { secondLiveDataValue: S -> value = firstLiveData.value to secondLiveDataValue }8 }9}
1class ExampleViewModel : ViewModel() {23 private val _liveDataOne = MutableLiveData<String>()4 val liveDataOne: LiveData<String> = _liveDataOne56 private val _liveDataTwo = MutableLiveData<Int>()7 val liveDataTwo: LiveData<Int> = _liveDataTwo89 val pairMediatorLiveData = PairMediatorLiveData(_liveDataOne, _liveDataTwo)10}
TripleMediatorLiveData
The same goes for the use case when we need three different types. For that case, we can use Kotlins Triple data type.
1import androidx.lifecycle.LiveData2import androidx.lifecycle.MediatorLiveData34class TripleMediatorLiveData<F, S, T>(5 firstLiveData: LiveData<F>,6 secondLiveData: LiveData<S>,7 thirdLiveData: LiveData<T>8) : MediatorLiveData<Triple<F?, S?, T?>>() {9 init {10 addSource(firstLiveData) { firstLiveDataValue: F -> value = Triple(firstLiveDataValue, secondLiveData.value, thirdLiveData.value) }11 addSource(secondLiveData) { secondLiveDataValue: S -> value = Triple(firstLiveData.value, secondLiveDataValue, thirdLiveData.value) }12 addSource(thirdLiveData) { thirdLiveDataValue: T -> value = Triple(firstLiveData.value, secondLiveData.value, thirdLiveDataValue) }13 }14}
What if we want to transform all the values of the triple into one single LiveData source? You can either use the static Transformations.switchMap function or make use of the lifecycle-livedata-ktx function and use the switchMap function directly on the LiveData
1class ExampleViewModel : ViewModel() {23 private val _liveDataOne = MutableLiveData<Double>()4 val liveDataOne: LiveData<Double> = _liveDataOne56 private val _liveDataTwo = MutableLiveData<Int>()7 val liveDataTwo: LiveData<Int> = _liveDataTwo89 private val _liveDataThree = MutableLiveData<Float>()10 val liveDataThree: LiveData<Float> = _liveDataThree1112 val switchMapLiveData: LiveData<Int> = TripleMediatorLiveData(_liveDataOne, _liveDataTwo, _liveDataThree).switchMap { mediatorState ->13 val firstValue = mediatorState.first?.toInt() ?: 014 val secondValue = mediatorState.second ?: 015 val thirdValue = mediatorState.third?.toInt() ?: 01617 return@switchMap liveData {18 emit(firstValue * secondValue * thirdValue)19 }20 }21}
The switchMap function will be invoked as soon as any of the observed sources inside the TripleMediatorLiveData will update.
Note: To prevent performance issues, you should avoid heavy lifting with inside the switchMap function because the transformation runs on the MainThread.
Transforming LiveData
Transforming LiveData is pretty easy to do and there is an awesome helper class named Transformations for just this purpose. This class provides three static methods: map, switchMap and distinctUntilChanged
Transformations.map
Transforms the value of LiveData into another value. Here’s a simple example of how this can be used:
1val player: LiveData<Player> = ...23val playerName: LiveData<String> = Transformations.map(player) { it.name }
Transformations.switchMap
1val searchQuery: LiveData<String> = ...23fun getSearchResults(query: String): LiveData<List<Player>> = ...45val searchResults: LiveData<List<Player>> =6 Transformations.switchMap(searchQuery) { getSearchResults(it) }
Transformations.distinctUntilChanged
Filters LiveData so that values will not be emitted unless they have changed. Many times we might be notified about a change that doesn’t contain any relevant changes. If we’re listening for the names of all players, we don’t want to update the UI when the score changes. This is where the distinctUntilChanged method is useful.
1val players: LiveData<List<Player>> = ...23val playerNames: LiveData<List<String>> =4 Transformations.distinctUntilChanged(5 Transformations.map(players) { players -> players.map { it.name } }6 )
livedata-ktx extensions for Transformations
All of the Transformations class functions above are also available as extension functions on LiveData using the dependency:
androidx.lifecycle:lifecycle-livedata-ktx:version
1val players: LiveData<List<Player>> = ...23val playerNames: LiveData<List<String>> = players.map { it.map { player -> player.name } }4 .distinctUntilChanged()
Behind the scenes of the Transformations class
We have just covered 3 simple transformations that you can actually write your self. All of them are written using the MediatorLiveData class. The MediatorLiveData class is the class I probably use most of all when dealing with LiveData (though I use map / switchMap / distinctUntilChanged when it makes sense).
To give you an example of when you should be creating your own MediatorLiveData class.
1val players: LiveData<List<Player>> = ...2val dbGame: LiveData<GameEntity> = ...34val game: LiveData<Game> = MediatorLiveData<Game>()5 .apply {6 fun update() {7 val players = players.value ?: return8 val game = dbGame.value ?: return910 value = Game(players = game.playerIds11 .mapNotNull { playerId ->12 players?.find { it.id == playerId }13 }14 )15 }1617 addSource(players) { update() }18 addSource(dbGame) { update() }1920 update()21 }
MediatorLiveData
MediatorLiveData can transform, filter and merge other LiveData instances. I tend to follow the same pattern whenever I create a MediatorLiveData, which looks something like this.
1val a = MutableLiveData<Int>(40)2val b = MutableLiveData<Int>(2)34val sum: LiveData<Int> = MediatorLiveData<Int>().apply {5 fun update() {6 // OPTION 37 val aVal = a.value ?: return8 val bVal = b.value ?: return910 // OPTION 411 value = aVal + bVal12 }1314 // OPTION 115 addSource(a) { update() }16 addSource(b) { update() }1718 // OPTION 219 update()20}
If you find yourself getting the current value of another LiveData using the .value property inside a map / switchMap or inside an observe-block, you should consider creating a MediatorLiveData to merge the sources properly instead.
Some extension functions related to MediatorLiveData
1import androidx.lifecycle.LifecycleOwner2import androidx.lifecycle.LiveData3import androidx.lifecycle.MediatorLiveData4import androidx.lifecycle.Observer56/**7 * Combine 2 LiveData into a Pair, emitting only when both sources are non-null8 */9fun <A, B> combine(a: LiveData<A>, b: LiveData<B>): LiveData<Pair<A, B>> {10 return MediatorLiveData<Pair<A, B>>().apply {11 fun combine() {12 val aValue = a.value13 val bValue = b.value14 if (aValue != null && bValue != null) {15 postValue(Pair(aValue, bValue))16 }17 }1819 addSource(a) { combine() }20 addSource(b) { combine() }2122 combine()23 }24}2526/**27 * Combine 3 LiveData into a Triple, emitting only when all three sources are non-null28 */29fun <A, B, C> combine(a: LiveData<A>, b: LiveData<B>, c: LiveData<C>): LiveData<Triple<A, B, C>> {30 return MediatorLiveData<Triple<A, B, C>>().apply {31 fun combine() {32 val aValue = a.value33 val bValue = b.value34 val cValue = c.value35 if (aValue != null && bValue != null && cValue != null) {36 postValue(Triple(aValue, bValue, cValue))37 }38 }3940 addSource(a) { combine() }41 addSource(b) { combine() }42 addSource(c) { combine() }4344 combine()45 }46}4748/** Extension on LiveData to combine it with another LiveData. See #combine **/49fun <A, B> LiveData<A>.combineWith(other: LiveData<B>): LiveData<Pair<A, B>> =50 combine(this, other)5152/** Extension on LiveData to combine it with another LiveData. See #combine **/53fun <A, B, C> LiveData<A>.combineWith(other: LiveData<B>, secondOther: LiveData<C>):54 LiveData<Triple<A, B, C>> =55 combine(this, other, secondOther)5657/**58 * Similar to Transformations.distinctUntilChanged but you define the predicate in isDistinct59 * @param isDistinct return true when obj and lastObj are the same, false otherwise60 */61fun <T> LiveData<T>.distinctBy(isDistinct: ((obj: T?, lastObj: T?) -> Boolean)): LiveData<T> {62 val distinctLiveData = MediatorLiveData<T>()63 distinctLiveData.addSource(this, object : Observer<T> {64 private var initialized = false65 private var lastObj: T? = null66 override fun onChanged(obj: T?) {67 if (!initialized) {68 initialized = true69 lastObj = obj70 distinctLiveData.postValue(lastObj)71 } else if (isDistinct(obj, lastObj)) {72 lastObj = obj73 distinctLiveData.postValue(lastObj)74 }75 }76 })77 return distinctLiveData78}7980/**81 * Used in similar use-cases as SingleLiveEvent where you need to monitor state changes to trigger82 * updates. Takes on LiveDate as source but will emit a Pair of the new and previous value83 */84fun <T> createPrevValueLiveData(ld: LiveData<T>): LiveData<Pair<T?, T?>> =85 MediatorLiveData<Pair<T?, T?>>().apply {86 var pastValue: T? = null87 addSource(ld) {88 value = Pair(pastValue, it)89 pastValue = it90 }91 }9293/**94 * Allows you to map LiveData values without having to deal with nullability. Ex:95 * val games = MutableLiveData<List<Game>>()96 * val nullableLastGame: LiveData<Game?> = game.map { game.firstOrNull() }97 * val lastGame: LiveData<Game> = game.mapNotNull { game.firstOrNull() }98 */99fun <T, K> LiveData<T>.mapNotNull(mapFun: (T) -> K?): LiveData<K> {100 val mediatorLiveData = MediatorLiveData<K>()101 mediatorLiveData.addSource(this) {102 mapFun(it)?.let { nonNullValue -> mediatorLiveData.value = nonNullValue }103 }104 return mediatorLiveData105}106107/** See #createPrevValueLiveData **/108fun <T> LiveData<T>.withPrevValue(): LiveData<Pair<T?, T?>> = createPrevValueLiveData(this)109110/** Observe only non-null values */111fun <T> LiveData<T>.observeNonNull(owner: LifecycleOwner, onChanged: (t: T) -> Unit) {112 observe(owner, Observer { it?.let(onChanged) })113}
to in kotlin
1infix fun <A, B> A.to(that: B): Pair<A, B>
Creates a tuple of type Pair from this and that.
This can be useful for creating Map literals with less noise.
1val map = mapOf(1 to "x", 2 to "y", -1 to "zz")2println(map) // {1=x, 2=y, -1=zz}
infix function
Kotlin allows some functions to be called without using the period and brackets. These are called infix methods, and their use can result in code that looks much more like a natural language.
1map(2 1 to "one",3 2 to "two",4 3 to "three"5)
to might look like a special keyword but in this example, this is a to() method leveraging the infix notation and returning a Pair<A, B>.
Common Standard Library Infix Functions
The various numeric classes – Byte, Short, Int, and Long – all define the bitwise functions and(), or(), shl(), shr(), ushr(), and xor(), allowing some more readable expressions:
1val color = 0x1234562val red = (color and 0xff0000) shr 163val green = (color and 0x00ff00) shr 84val blue = (color and 0x0000ff) shr 0
The Boolean class defines the and(), or() and xor() logical functions in a similar way:
1if ((targetUser.isEnabled and !targetUser.isBlocked) or currentUser.admin) {2 // Do something if the current user is an Admin, or the target user is active3}
The String class also defines the match functions as infix, allowing some simple-to-read code:
1"Hello, World" matches "^Hello".toRegex()
Writing an infix function is a simple case of following three rules:
- The function is either defined on a class or is an extension method for a class
- The function takes exactly one parameter
- The function is defined using the infix keyword
1class Assertion<T>(private val target: T) {2 infix fun isEqualTo(other: T) {3 Assert.assertEquals(other, target)4 }56 infix fun isDifferentFrom(other: T) {7 Assert.assertNotEquals(other, target)8 }9}1011val result = Assertion(5)1213result isEqualTo 5 // This passes14result isEqualTo 6 // This fails the assertion15result isDifferentFrom 5 // This also fails the assertion
Note that infix functions can also be written as extension methods to existing classes.
1infix fun String.substringMatches(r: Regex) : List<String> {2 return r.findAll(this)3 .map { it.value }4 .toList()5}67val matches = "a bc def" substringMatches ".*? ".toRegex()8Assert.assertEquals(listOf("a ", "bc "), matches)
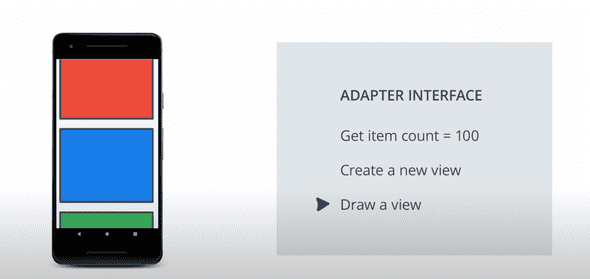
When RecyclerView runs it will use the adapter to figure out how to display your data on screen
When it starts out it will ask the adapter how many items there are. Then it will immediately start creating just the views needed for the first screen. RecyclerView will ask the adapter to create a new view for the first data item in your list. Once it has the view it will ask the adapter to draw it. It will repeat it until it doesn't need any more views to fill the screen.
Then recyclerView is done and it won't look at the other items in the list until the user scrolls the list on the screen. If items go off the screen, they will be reused or recycled in the next position that gets displayed. When recycling recyclerview doesn't need to create a view it will just use to old one and will ask the adapter how to draw next item on it.
RecyclerView doesn't interact to views but instead ViewHolders. ViewHolder as name says hold views. They also have lot of extra information that RecyclerView uses to efficiently move views around the screen. ViewHolders knows things like last position the items have in the list.
You adapter will take care of providing any ViewHolders that RecyclerView needs.
So Our app has a list of items which the Adapter will adapt into something that can be drawn on the screen. RecyclerView will find out how many items there are by asking the Adapter, then for each item RecyclerView wants to put on the screen, it will ask the adapter for a new ViewHolder and draw an item into this ViewHolder. For efficiency RecyclerView will reuse or Recycle ViewHolders that are scrolled off the screen whenever it can. Reusing the views is done by keeping the view but just resetting the value after we have used contents such as changing the text shown or images displayed.
LinearLayoutManger lays out the items in a list of full width roles
onBindViewHolder
this method will only be called for items that are either on the screen or just about to scroll onto the screen.
onCreateViewHolder
this methods is called when RecyclerView needs a new ViewHolder of the given type to represent an item. RecyclerView might need a ViewHolder when it just started up and its displaying the first item or the number of items on the screen increased. The parent is the viewGroup into which the new view will be added after it is bound to an adapter position. In reality this parent will always be RecyclerView. The viewtype is used when there are mulitple different views in the same recyclerview.
To inflate a layout from xml you use a layout inflator just like in Activities and Fragments
Creating a layout inflator
You can create a layout inflator from any view or viewgroup by passing the context.
1LayoutInflater.from(parent.context)
This means that you will create a layout inflator based on the parent view. This is somewhat import to use the right context. Views know a lot about themselves and LayoutInflater uses that information to inflate new views correctly. If you just pass here some random context here for example application context, you might get views with unexpected colors, fonts and sizes. Since RecyclerView will this add item for us when its time, it will throw an exception if we added it now.
To let the recyclerview know that data has changed you will add a custom setter to the data variable, Once data is changed calling adapter method notifyDatasetChanged. This tells recyclerview that entire data set has changed and will call the recyclerview to immediately re-draw everything on screen based on new data. Since it tells recyclerview that whole list has updated, the recyclerview has to immediately redraw everything on screen. If items were complex, this can be pretty slow operation. Possibly slow enough that it interupts the user scrolling
We need to ensure that onBindViewHolder always sets or resets anything that might have been set by previous items while they were on screen.
Recyclerview.ViewHolder
A viewHolder describes an itemview and metadata about its place within the recyclerview. ViewHolder tells recyclerview where and how an item should be drawn on the list
DiffUtil
DiffUtil has a class called ItemCallback that we need to extend in order to figure out differences between 2 items.
oldItem == newItem
This will perform an equality check on items which is what we want. We know that equality check will check all the fields because we defined classed as a data class. Data class automatically define equals and few other methods for you.
binding.executePendingBindings()
We can ask data binding to execute our bindings right away. It is always a good idea to execute pending bindings when using binding adapters in RecyclerView.
LayoutManagers in Recylerview
They manange how the items in the Recyclerview will be laid out
We can also implement our custom layout managers
Getting the layout manager to a RecyclerView can be done by defining your layout manager in RecyclerView XML declaration.
Span
SPan is used to describe one section of the grid.
What happends if no layout manger is defined for recyclerview
We will get this message in logcat but we won't receive crash.
Sealed Class
A sealed class defines a closed type. Means all subclasses of this type must be defined in this file. As a result number of sub-classes are known to the compiler and its not possible for another part of your code to define a new type of data. Since header has no actual data we can declare it as an object, that means there will only be 1 instance of a header
1sealed class DataItem {2 data class SleepNightItem(val sleepNight: SleepNight): DataItem() {3 override val id = sleepNight.nightId4 }56 object Header: DataItem() {7 override val id = Long.MIN_VALUE8 }910 abstract val id: Long11}
We need to tell RecyclerView to support any type of viewholder
We can do this by changing the second generic argument to RecyclerView.ViewHolder
Get back to UI thread or it will show an error
1private val adapterScope = CoroutineScope(Dispatchers.Default)2 fun addHeaderAndSubmitList(list: List<SleepNight>?) {3 adapterScope.launch {4 val items = when (list) {5 null -> listOf(DataItem.Header)6 else -> listOf(DataItem.Header) + list.map{DataItem.SleepNightItem(it)}7 }8 }9 withContext(Dispatchers.Main) {10 submitList(items)11 }12 }13}
Configuring Span size lookup on Grid Layout Manager
1manager.spanSizeLookup = object : GridLayoutManager.SpanSizeLookup() {2 override fun getSpanSize(position: Int) = when (position) {3 0 -> 34 else -> 15 }6}
Retrofit Scalar convertor
Library that allows retrofit to return JSON result as String.
Moshi
Moshi parses JSON into Kotlin Objects.
Deferred
Deferred is kind of a Coroutine job that can directly return a result.
Coroutine job provides a way of cancelling and determining state of a result
But unlike a job deferred has a method called await. Await is a suspend function on the deferred. It causes the code to await without blocking in true coroutines fashion until the value is ready and then the value is returned
Retrofit does all of its work in the background thread
There is no reason to use any other thread for our scope.
The image has to be downloaded, buffered and decoded from the complex format it is in to a image that can be used by the Android
It should be cached either to an in-memory cache, a storage based cache or both. All of this needs to happen in low priority background threads.
Binding Adapter
1@BindingAdapter("imageUrl")2fun bindImage(imgView: ImageView, imgUrl: String?) {3 imgUrl?.let {4 val imgUri = imgUrl.toUri().buildUpon().scheme("https").build()5 Glide.with(imgView.context)6 .load(imgUri)7 .into(imgView)8 }9}
Preview in Design view
1tools:itemCount="16"2tools:listitem="@layout/grid_view_item" />
GridLayoutManager in xml
1app:layoutManager="androidx.recyclerview.widget.GridLayoutManager"2app:spanCount="2"
Triple ===
True if object references are the same.
binding.executePendingBindings
It causes the property update to execute immediately. Since we are calling bind from onBindViewHolder having the bindings execute immediately as a practice can prevent RecyclerView from having to perform extra calculations when it figures out how to display the list.
clipToPadding
There is some padding that remains around the RecyclerView as we are scrolling. So it never looks like it is being scrolled under the action bar. Just tell the RecyclerView not clip the inner contents to padding
1android:clipToPadding="false"
Binding Adapter for Networking actions
1@BindingAdapter("marsApiStatus")2fun bindStatus(statusImageView: ImageView, status: MarsApiStatus?) {3when (status) {4 MarsApiStatus.LOADING -> {5 statusImageView.visibility = View.VISIBLE6 statusImageView.setImageResource(R.drawable.loading_animation)7 }8 MarsApiStatus.ERROR -> {9 statusImageView.visibility = View.VISIBLE10 statusImageView.setImageResource(R.drawable.ic_connection_error)11 }12 MarsApiStatus.DONE -> {13 statusImageView.visibility = View.GONE14 }15}16}
1<ImageView2 android:id="@+id/status_image"3 android:layout_width="wrap_content"4 android:layout_height="wrap_content"5 app:layout_constraintBottom_toBottomOf="parent"6 app:layout_constraintLeft_toLeftOf="parent"7 app:layout_constraintRight_toRightOf="parent"8 app:layout_constraintTop_toTopOf="parent"9 app:marsApiStatus="@{viewModel.status}" />
Parcelling
In Android parcelling is a way of sharing objects sharing between different processes by flatting a object into a stream of data called parcel. A complex object can be stored into the parcel and then re-created from parcel by implementing the parcelelable interface. Each object is written in sequence to the parcel. The object is recreated by reading data from the parcel in the same order it was written to populate data into a new object.
Using parcel to share an object between processes is functionally similar to using XML or JSON to share data between services and clients.
If you add any new property to the class you have to remember to update both the methods. If we don't, we will either create a incorrect object or more likely crash our application
Fortunately there is easier way to get help with Parcelable, the Koling Android extensions. We can add @Parcelize annotation to the class.
Bundle
Bundle is a parcelable object that contains a key value store of parcelable objects.
We use bundles as the argument property in Fragments primarily because of the way how Android lifecycle works. Activity will be destroyed with a savedInstanceState if the app is killed when running in the background. All of the information in the savedInstanceState has to be from Parcelables since state is used to re-create objects when the app gets restarted and is therefore a new process.
When a activity is re-created in this state, FragmentManager needs to be able to recreate all of its fragments, since they are parcelable. Bundles can be stored in OnSavedInstanceState allowing Fragments to preserve their arguments when the process is destroyed and Fragment is re-created
How navigation save args work internally
How data binding and view binding work internally
Your browser has a cache
It stores a copy of every webpage you visit on the local file system so that we load the resources locally the next time you visit the page
Every Android app has access to a folder
that it can use to store files and data. We can implement a cache the way your web browser does in your Android app using Retrofit.
Everytime you get a network result keep a copy on disk. The next time you query the same place you load the stored copy from the disk. You can configure Retrofit to do this caching for you.
Cache invalidation
Cache invalidation means knowing when the data in a cache is not correct anymore. Network requests over http have a bunch of features to help with this and when you enable network caching
SharedPreferences isn't a great way to store a lot of data or structured data.
Comapred to Room database it won't let you do complex queries against your offline cache.
Offline caching using File system
We can access your apps folder and write any file/files you want. Its private to your app and it will be cleared when your app is uninstalled. But this means we will be managing files yourself.
Writing a new name to your local db
We can do this by writing a new name to your local db and then writing it to the server. This is a major problem. Here server may end out of sync and as network mioght not be available or error happening while saving data. This means app will show incorrect data from offline cache.
The easiest way to update values is to stop dalay updating the offline cache until after the server lets you know that data is saved.
When you call insertAll
It throws an exception if there is already an enity with the same primary key in the database. To solve this we will specify a conflict strategy. It tells the db what to do when it experiences a conflict i.e when you try to insert the same primary key that's already in the database
1@Insert(onConflict = OnConflictStrategy.REPLACE)2fun insertAll(vararg users: User)
Data transfer object vs domain object
DTO like network video in network package are for parsing results from the network. We seperate this from domain objects because they contain extra logic for parsing network results thats not relevant to what they represent
Domain objects in the Domain package are the data that our app uses internally. We don't ever share them over the network or database. This way the server can completely change its results without impacting internal working of our app.
Seperate class in the database package
thats for saving and loading results from the database. It will have some extra annotations to make it work with room.
Its a good practice to seperate your network, domain and database objects
vararg
vararg means variable arguments and its how a function can take an unknown number of arguments in Kotlin. It will actually pass an array under the hood.
When we query room db from UI thread and it returns a basic list type
It will block the UI thread. When we use LiveData of list, room will query the database in the background for us and it will even update the liveData anytime new Data is writtem to the table.
Figure out whether isInitalised
1!::INSTANCE.isInitialized
To figure out if instance is initialized kotlin functions isInitalised. This is available on lateinit variables
Make initalised thread safe
To make initialization thread safe we can wrap it in synchronized.
Repository
Repository will provide a unified view of our data from several different sources. In our app data will come from internet and the database to be combined in the repository.
Users of the repository don't have to care about where the data comes from. Its all hidden away behind the interface provided by the repository. The repository has one other responsibility. It manages the data in the cache.
Databases on Android
Databases on Android are stored on the file system or disk and in order to save they must perform a file write. Reading and wrtiting to a disk is called Disk IO. Disk IO is very slow compared to reading or writing variable that are stored in RAM. In addition the low level APIS that the database uses are blocking that means they will always block a thread until the read and write operation is complete. Because of this we have to treat disk IO seperately when using coroutines. It is important that disk IO runs on the DISPATHCHERS.IO. This dispatcher is specifically tuned for running tasks that read and write to disk, like database operations.
withContext
it forces a coroutine to switch to a dispatcher specified
1suspend fun refreshVideos() {2 withContext(Dispatchers.IO) {3 val playlist = Network.devbytes.getPlaylist().await()4 database.videoDao.insertAll(*playlist.asDatabaseModel())5 }6}
How can 2 different apps communicate
Workmanager CoroutineWorker
Workmanger supports coroutine directly if we use coroutine worker.
Worker classed have to implement doWork. In this coroutine version doWork is a suspend function. Our worker will run until doWork returns the result. Workmanger will ensure that operating system doesn't interupt our work.
doWork will run in a background thread so we don't have to worry about blocking the UI thread.
1override suspend fun doWork(): Payload {2 val database = getDatabase(applicationContext)3 val repository = VideosRepository(database)45 return try {6 repository.refreshVideos()7 Payload(Result.SUCCESS)8 } catch (e: HttpException) {9 Payload(Result.RETRY)10 }11}
Here we are saying whenever there is HTTP exception from retrofit to retry this job sometime in future.
Application.oncreate will run everytime your App launches and it has to run before any screen is shown
If you do a lot of stuff on onCreate your users have to wait for that work everytime they launch your app.
To make sure our onCreate is fast lets take extra initialization out
There are 2 types of workrequests
one-time and periodic. Since we want to have our sync task daily we will use periodic request
If another enqueue unique periodic work request passes the same name
WorkManger will treat those requests as the same job.
ExistingWorkPolicy tells workmanger what to do when 2 requests for the same unique work are enqueued.
1val constraints = Constraints.Builder()2 .setRequiredNetworkType(NetworkType.UNMETERED)3 .setRequiresBatteryNotLow(true)4 .setRequiresCharging(true)5 .apply {6 if (Build.VERSION.SDK_INT >= Build.VERSION_CODES.M) {7 setRequiresDeviceIdle(true)8 }9 }.build()
Rendering
Know that system will attempt to redraw your activity every 16ms, which means your application needs to run all the logic to update the screen in the 16ms window so that you can hit 60 frames per second.
This frames per second generally comes from phone's hardware which defines how fast the screen can update itself in a single second.
Most of your devices will refresh at 60Hz meaning you got 16ms to do all of your drawing logic each frame. If you miss that window say take 24ms to finish your calculations you get a droppped frame. The system tried to draw a new picture to the screen, but one wasn't ready yet. So it didn't refresh anything.
The user ends up seeing the same graphic from 32ms rather than 16ms. Any animations going on during a dropped frame will manifest themselves to users with a jump in their smoothness.
The android rendering pipeline is broken
into 2 sections CPU and GPU. They both work together in order to draw images on the screen.
Now on the CPU side the most common way performance problems come from unneccessary layouts and invalidations i.e part of the view hierarchy having to be measured, torn down and rebuilt. This comes in 2 problematic flavors either the display list are being built too many times during a frame or you are spending too much time invalidating too much of your view hierarchy and needlessly redrawing.
Now second major problem is on GPU side, involving an in-efficiency called overdraw, which is effectively when we waste GPU processing time coloring in pixels that end up getting colored in later by something else.
Rasterization
This is a process of taking some high level object like a string or a button or a path or a shape and turning it into pixels in a texture or on your screen. Rasterization is a very time consuming process. There is a special piece of hardware in your mobile device that is designed to make this happen a lot faster.
GPU(Graphics processing unit) was introduced to mainstream computers back in early 1990s to help accelerate rasterization process
GPU is designed to use specific set of primitives dominately ploygons and textures a.k.a images and CPU is .responsible for feeding these to the GPU before it can draw anything to the screen. This is dones through a common API called OPENGL ES
This means that anuytime your UI objects like buttons or paths or checkboxes need to be drawn on the screen, they are first converted to polygons and textures in the CPU and then passed off to the GPU for rasterization.
This process of converting a UI object to a set of polygons and textures is not fasteset of operations. Same way uploading the process data from the CPU to the GPU is not fast either. So it makes sense that you would want to reduce the number of times you have to convert a object as well as the number of times you have to uplaod it for drawing.
Thankfully OPENGL ES Api allows you to upload content to the GPU and leave it there. When you would like to reference drawing a button again in the future, you simple have to reference in th GPU memory and then tell OPENGL how to go about drawing it.
Optimizing for rendering performance means getting as much data on th GPU as fast as possible and then leave it there without modifying it for as long as possible because everytime you update a resource on the GPU you loose precious processing time.
With newer Android versions the entire rendering system works with the GPU and more improvements have been made to the rendering system performance. Android system does a lot to reduce reuse and recycle GPU resources on our behalf.
Any resource provided by theme, like bitmaps drawables etc are all grouped together into a single texture and then uploaded to the GPU alongside commonly used meshes like 9Patches for example. This means anytime you need to draw one of these resources, all the content is already there in the GPU making these type of views really fast to display. This rendering process gets more and more complex as you UI objects get more and more advanced. Displaying a image means uploading the image onto the CPU and then passing it to the GPU for rendering. Using paths is whole seperate mess you might need to create a chain of ploygons in the CPU.
First we have to draw characters in the CPU to a image and then upload that image to the GPU and then go back through and draw rectangle on screen for each character on the screen .
Now performance of these operations are mostly handled by the operating system on your app's behalf and unless you are doing something excessive you really shouldn't see much of a GPU problem.
Overdraw
This is a term used to describe how many times a pixel on the screen has been redrawn in a single frame.
For example if we have a bunch of UI cards, all the cards that are on the top of the stack closer to the user will hide large proportions of the card that are hidden underneath. Meaning that we will spend time drawing those cards which a remostly invisible. This is actually a large problem because each time we are rendering pixels that don't contribute to the final scene, we are wasting GPU performance.
To maximize performance you will want to minimize overdraw. Fortunately it is easy to see amount of overdraw in your applications.
Enable GPU overdraw in developer options. Android is using different colors to highlight areas of overdraw occuring on your screen.
If you have only rendered a pixel one time you should see it in its true color with no tint.
There are two main ways you can reduce overdraw. Firstly you will want to eliminate unneeded backgrounds and drawables from views that won't contribute to final rendered image. Secondly you define areas of your screen that you know will hide portions of your view which can help reduce CPU and GPU overload.
1getWindow().setBackgroundDrawable(null)
Android will go out of its way to avoid drawing UI widgets that may be invisible in the final image. This type of optimization called clipping is highly important to UI performance.
If you can determine an object will be fully obsecured there is no reason about drawing it. But this technique doesn't extend itself to complex custom views where you are overriding the canvas.onDraw method. In these cases the underlying system doesn't have insight into how you are drawing your content which makes it readlly hard for it to remove hidden views from your rendering pipeline.
Here only top card is fully visible. Rest of the cards are almost fully hidden.
The canvas class is equipped with few special methods that you can use to tell the Android framework what parts of the canavs are hidden and don't need to be drawn. Most useful method is canvas.clipRect which allows you to be define the drawable boundaries for a given view meaning that if any canvas drawing happends outside these boundaries it will be ignored. So clipRect api helps the system know what to avoid drawing
In Order to draw something on the screen Android generally needs to convert all that high level xml into something that GPU can accept and use to render on the screen. This is done with the help of an internal Android object called display list. A display list holds all the necessary information needed to render a view on the GPU. It contains a list of the all the GPU resident assets that might be needed as well as a list of commands to execute with OpenGL in order to render it.
1
Many programming languages are closer to the hardware
they are high performance like C, C++. They require developer to manage memory themselveds. Programmers are responsible for allocating and de-allocating memmory themselves. Sometimes memory doesn't get freed properly. These blocks of memory are called Memory leaks. Managed memory languages were created. The run times of these languages track memory allocations and release memory back to the systemn when its no longer needed.
Basic principles of garbage collections as:
- Find data objects in a program that can not be accessed in the future. For example: Any memory that is no longer referenced by the code.
- Reclaim, the memory used by those resources.
Memory heaps in Android runtime are segmented into spaces based on the type of allocation and how best the system can organize allocations for future GC events.
More time your app is spending doing GCs in a given frame, less time it is got to for the rest of the logic needed to keep you under the 16 ms barrier.
Now anytime we see allocated memory drop by a significant amount thats pretty good signal that the garbage collection event has occured.

Memory leaks are objects which the application is no longer in use and GC fails to recognize them as unused.
Some memory leaks are easy to create like making circular references to objects which the program isn't using.
Tracking Down the Leak in Code
Looking at the custom view's init method:
1private void init() {2 ListenerCollector collector = new ListenerCollector();3 collector.setListener(this, mListener);4}
It’s a seemingly harmless idea to store away all view listeners for a particularly activity, but if you forget to clean them up, you may inadvertently create a slow leak. This is the case with the line:
1collector.setListener(this, mListener);
This problem is compounded when the activity is destroyed and a new one is created. In this example, when a new activity is created due to the device orientation changing, an associated Listener is created by the view, but when the activity is destroyed, that listener is never released. This means that no listeners can ever be reclaimed by Java's garbage collector, which creates a memory leak.
When the device is rotated and the current activity’s onStop() method is invoked, make sure to clean up any unnecessary references to view listeners.
All declarations in Kotlin are considered as Non-Null bu default
Meaning we will get compile time error if we set them as null. If you want a standard JAVA style reference that can hold null value then you will get Question mark.
